|
Why DrainEASY™?
How It Works
Features & Benefits
Why is it Green
Installation & Operation
FAQ’s
Where to Buy |
|
| |
|
| Testimonial |
1. Long Needed
"I couldn't believe what I saw when I received the notice on this product. I installed the two I bought and enjoy the freedom from cleaning and fishing. Bathroom sinks are famous for clogging because of the oils entering the sink. Also I have on several occasions have had to fish out a ring or other objects from the sink. Now cleaning and fishing are a snap. readmore>>
2. Great product
"This is a wonderful invention! So far no clogged drains! Just turn the valve every so often and you sink should never clog! Love the design and the tight fit with the other plumbing- no leaks either!" readmore>>
3. Great idea, Easy five minute install, Never clog!!!
Got this as a gift as requested. It took all of five minutes to install it, that includes getting a bucket to remove the existing p-trap, unscrew everything (no tools even needed), take out old p-trap, put this one in, screwed everything back on. readmore>>
4. Drained
I am a single woman with a single daughter who should have been moved out years ago! For years My bathroom sink would clog leading to use some very strong chemicals or calling on my boy friend to remove the drain and remove the debris. usually lots of hair. I ordered this and presented this task to my boyfriend who was skeptical at first but the knob impressed him. The installation was easy, readmore>>
5. It's awesome! Buy with your eyes shut!
Guess what! It's such a big peace of mind to know that your drain pipe is transparent. Even when I don't own a diamond ring that could get lodged there!
Even my very experienced grey-haired ARS guy the other day was awestruck when he saw that. "Where did you get that? It's amazing!" he remarked. It felt good that I was ahead of his other customers and readmore>>
6. Great for bathrooms
Like most men, I have facial hair that requires the occasional trimming/shaving/ shaping/modifying. I usually perform said maintenance over my bathroom sink. Unfortunately, everywhere I've ever lived and shaved at, the sink starts to clog. Doesn't matter if I diligently remove move of the hair and throw it in the trash, some works its way into the drain and readmore>>
7. Excellent product
I purchased 6 PermaFlow products to put into a new home. They work wonderfully. It is so helpful to have a visual of what is or is not in the drain! I recommend them to all my friends. Simple but effective! readmore>>
8. PermaFLOW Review
I read all of the reviews of this product, pro and con, including the responses by the manufacturer. I decided to order two of them to try. They were easy to install and haven't leaked a drop. I am going to order two more. To those who gave the product bad reviews, either you haven't tried them or you did something wrong. I think one of the problems some people have may be caused by over tightening. readmore>>
|
|
|
|
|
|
Installation:
- Simply unscrew your existing bath tub stopper to install the DrainEASY Bath Tub Stopper.
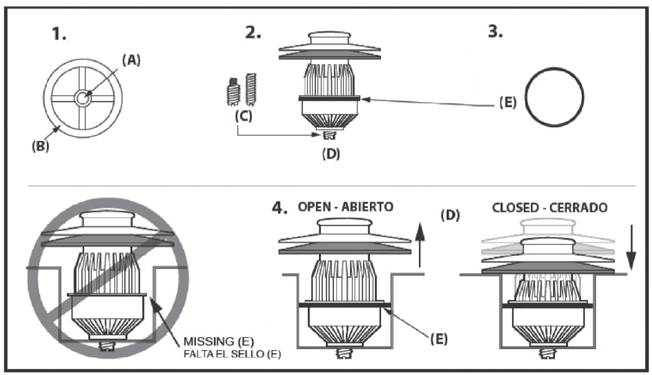
- For best results, clean your drains before installation. Cleaner pipes allow the DrainEASY drain to better prevent clog formation. After cleaning the drain, locate, cross member, hole (A) in drain opening (B).
- Select screw (C) that best fits hole (A) and screw it in base of device (D).
- Screw device into the drain opening (B). If the pre-installed white seal outer seal prevents installation of the device into drain opening (B) replace it with the black seal (E) provided in the package. Ensure that device (D) fits snugly in drain opening (B). Only a snug fit will ensure that all materials are captured on the device’s collection grate (place small bead of shampoo around outside edge of the o-ring to aid insertion in drain opening).
- Push device up/down 3 to 5 times when water flow is impeded by collected material. It is normal to hear and feel the hair ripping on the first push of the device. If device accumulates too much material at once, unscrew & clean. Replace every five years or as needed.
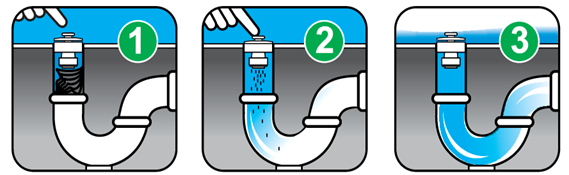
Operation:
- Once installed, push down to close grate when taking a bath or pull to open grate when taking a shower.
- After each shower or bath, push and pull the DrainEASY a few times to chop the hairs with the water flowing to help move the hairs.
- In case of large chunks of hair settling in the DrainEASY, just rotate counter clockwise to remove, clean and re-install.
Install FAQ’s:
-
Does your device fit all drains?
The DrainEASY Stopper for tubs fits all bathtub drains in the U.S. Some drains, manufactured prior to 1989 have some variable features that we have designed this page to address. If you purchased a drain device and found that your tub drain didn't have a hole in the cross members to screw our device into, you have a toll free number on your instruction sheet to call into, and you will be supplied a retrofit piece free of charge. Fall of 2010 will see our follow-on devices for bathroom sinks, and shower stalls (i.e. showers without the surrounding tub). Spring of 2011 we will release a spring loaded version of our tub device.
-
What do I do if I am having trouble inserting the device with the best fitting o-ring?
You've done the right thing by choosing the best fitting o-ring to keep water and hair from getting by the device on the outside edge. However, by choosing the best fit, it may occasionally be difficult to get the device in place without the o-ring dislodging from the base of the device. In this case, you need simply apply a thick bead of shampoo on the inside edge of the drain hole. This degree of lubrication will ensure you get the best fit, and that the o-ring stays in the proper position during installation. If not even the smallest o-ring allows you to fit your device, see below.
-
Not even the smallest o-ring allows me to insert my DrainEASY Stopper. What do I do?
You have a 1.4" inside diameter drain, which is the most narrow type currently sold for tubs in the U.S. The DrainEASY Stopper was designed to fit that size drain without an o-ring. Simply lube up the inside part of the drain with shampoo, and install. If this doesn't work, see DISASSEMBLE INSTALL below.
-
I can't screw the device in place without unscrewing the top knob...what do I do?
As noted in the question above, a tight fitting o-ring, while the best choice for proper function of your DrainEASY Stopper device, can sometimes necessitate that the user place a bead of shampoo on the inside edge of the drain hole. Once you've done this, compress the device, place another bead of shampoo on the underside of the rubber seal (the part the plugs the drain if you take a bath), then insert the drain in the hole and screw in place. If that doesn't work, go ahead and disassemble the device as explained below, and install.
-
How to do a disassemble install?
Sometimes your device is fits so snug that it wants to prevent you from screwing it in place. In this situation, simply take off the top knob, remove the cap pieces and the plunger arm piece, then LIGHTLY pinch the lock legs together and remove them. You now have the base piece exposed. Take a pair of needle nosed pliers and place the tips in the two biggest holes on the capture grate (the two big holes on the area that captures the hair from the waste stream). You are now holding the base piece with the pliers, so put the o-ring on, lube up the inside of the drain wall, and engage the screw in the cross member, using the pliers to firmly grip the base piece as you screw it in place. Once in place, simply reassemble your device (lightly pinch the lock legs and line them up wither their guide slots, then put on the plunger arm piece, then the cap pieces, then screw the knob in place to secure)...you have now done a disassemble style installation!
-
I have a hole in the cross member of the drain, but the threads don't fit the screws; what do I do?
Choose the biggest screw that can still fit in the hole of your cross member. If the threads don't engage, you will need to purchase an epoxy putty (we recommend Fast-n-EZ from PC Products, available at ACE & True Value hardware stores). Now do the following:
*Ensure you have chosen the correct sized o-ring for the remainder of the install (the proper size o-ring will keep everything in alignment for the remainder of this process.
*Use a Q-tip with nail polish remover or rubbing alcohol to clean the threads of the hole of your cross member and allow to dry (the epoxy will not work if the surfaces are wet at the time of application).
*Mix the epoxy and place a small amount on the last 2-3 exposed threads of the screw, and in the screw hole of your drain's cross member.
*Insert your device, ensuring the screw sets into the screw hole of your drain's cross member...now let sit for 3 to 4 hours before allowing water to flow into your drain.
-
My DrainEASY Stopper device seems hard to compress...will I break it if I push too hard?
Your drain device was built to handle a great deal of compression force...you won't break it by compressing it. The more hair that accumulates in between uses, the more force you you will need to use, but all you need do is press with your palm if that situation arises. You will notice that the device becomes easier to compress after pushing the device up and down 5-10 times.
-
I pulled the device apart...is it broken?
We designed the top and bottom pieces to pull apart if the user pulls with greater than 15lbs. of force. This was done to allow the user access to collection grate. If you need to access the collection grate (say, because you dropped a contact lens in the shower and it washed into your DrainEASY Stopper), you need simply unscrew the top knob, and pull off the top pieces. Inside, you will see a piece that locks the top parts to the bottom parts (called the "lock legs"). Pulling on the lock legs with more than 15lbs of force, or LIGHTLY pinching the legs together while simultaneously pulling up on the part, will disengage it from the base and allow you access to the collection grate without having to completely remove the device.
-
I really don’t need tools to install your devices?
Our devices are made to install by hand, with no need for access to the underlying plumbing, except for our soon-to-be-released sink device.
-
Is there anything I should do before installing your product?
You will get the best results if you clean your drain one final time before installing the DrainEASY Stopper device. Removing old clogs with a 'plumber's snake' (the preferred method if you want to be certain you have cleaned out your pipes), or chemical drain cleaner one last time will mean that the ripped up material that comes out of the bottom of the DrainEASY device when you operate it will have nothing to hang up on. In 'clean' plumbing, DrainEASY prevents 95-100 percent of clogs! See "installation" tab on this website for complete instructions.
-
I have a trip-lever style drain plug in my tub already, do I have to remove it in order to use your product?
No, you do not have to remove it.
-
Oh no! I dropped something into my drain...can I get it out without hurting it?
Yes! You need only unscrew the top knob, pull off the top pieces, lightly pinch the "lock leg" piece together slightly (the "lock leg" piece is the one that moves up and down inside the base...the legs you pinch look like little hooks that fit into the base), and pull it up. You should now be able to get to whatever it was that fell into the collection grate of your device without damaging it.
-
Ooops, I think I overloaded my DrainEASY Stopper with pet hair...is it broken now?
Nope, your device still works just fine. However, just like overloading a garbage disposal, too much stuff going down at once can overload the mechanism that rips up hair. If you are going to bathe a pet, you need only pull the top off the device as detailed above, then use the collection grate as a filter to keep the pet hair from going down the drain and causing a clog. When Fido is done getting his bath, simply clean the collection grate, put the pieces back together in reverse order, and your device is ready to go!
DrainEASY– Safe, Green and Sustainable Design
- Eliminates Nasty Effects of Chemical Drain Cleaners on Water/Drain System
- Reduces Contamination of Water System
- Reduces Corrosion of Drain Pipes
- Reduces Wastage of Water
- Reduces Use of Chemicals Required to Treat Water System
- Contributes to Safe, Healthy Environment
- Offers alternative to Hazardous Products
- Blocks the Introduction of Indoor Contaminants
- Conserves Natural Resources
- Very Low Maintenance Impact on Environment
|
|